Sunday, December 19, 2010

O Christmas tree, O Christmas tree

This is quite possibly my most favorite holiday nail art of all time.
To start, I gathered all the polishes I needed - Use whatever colors you like. Unfortunately, I didn't think to take pictures or make mental notes of the exact names of what I used. Basically, I used a white (from Sally Hansen), red (ORLY Monroe's Red), black (striping polish), green (Funky Fingers Blitzen), gold (Milani holographic), silver (Milani holographic), blue (from Funky Fingers), and a brown (OPI You Don't Know Jacques).

I started out with my usual base coat of Sally Hansen's Insta-Grip. I applied two coats of white polish, and put a fast-drying top coat on the top.

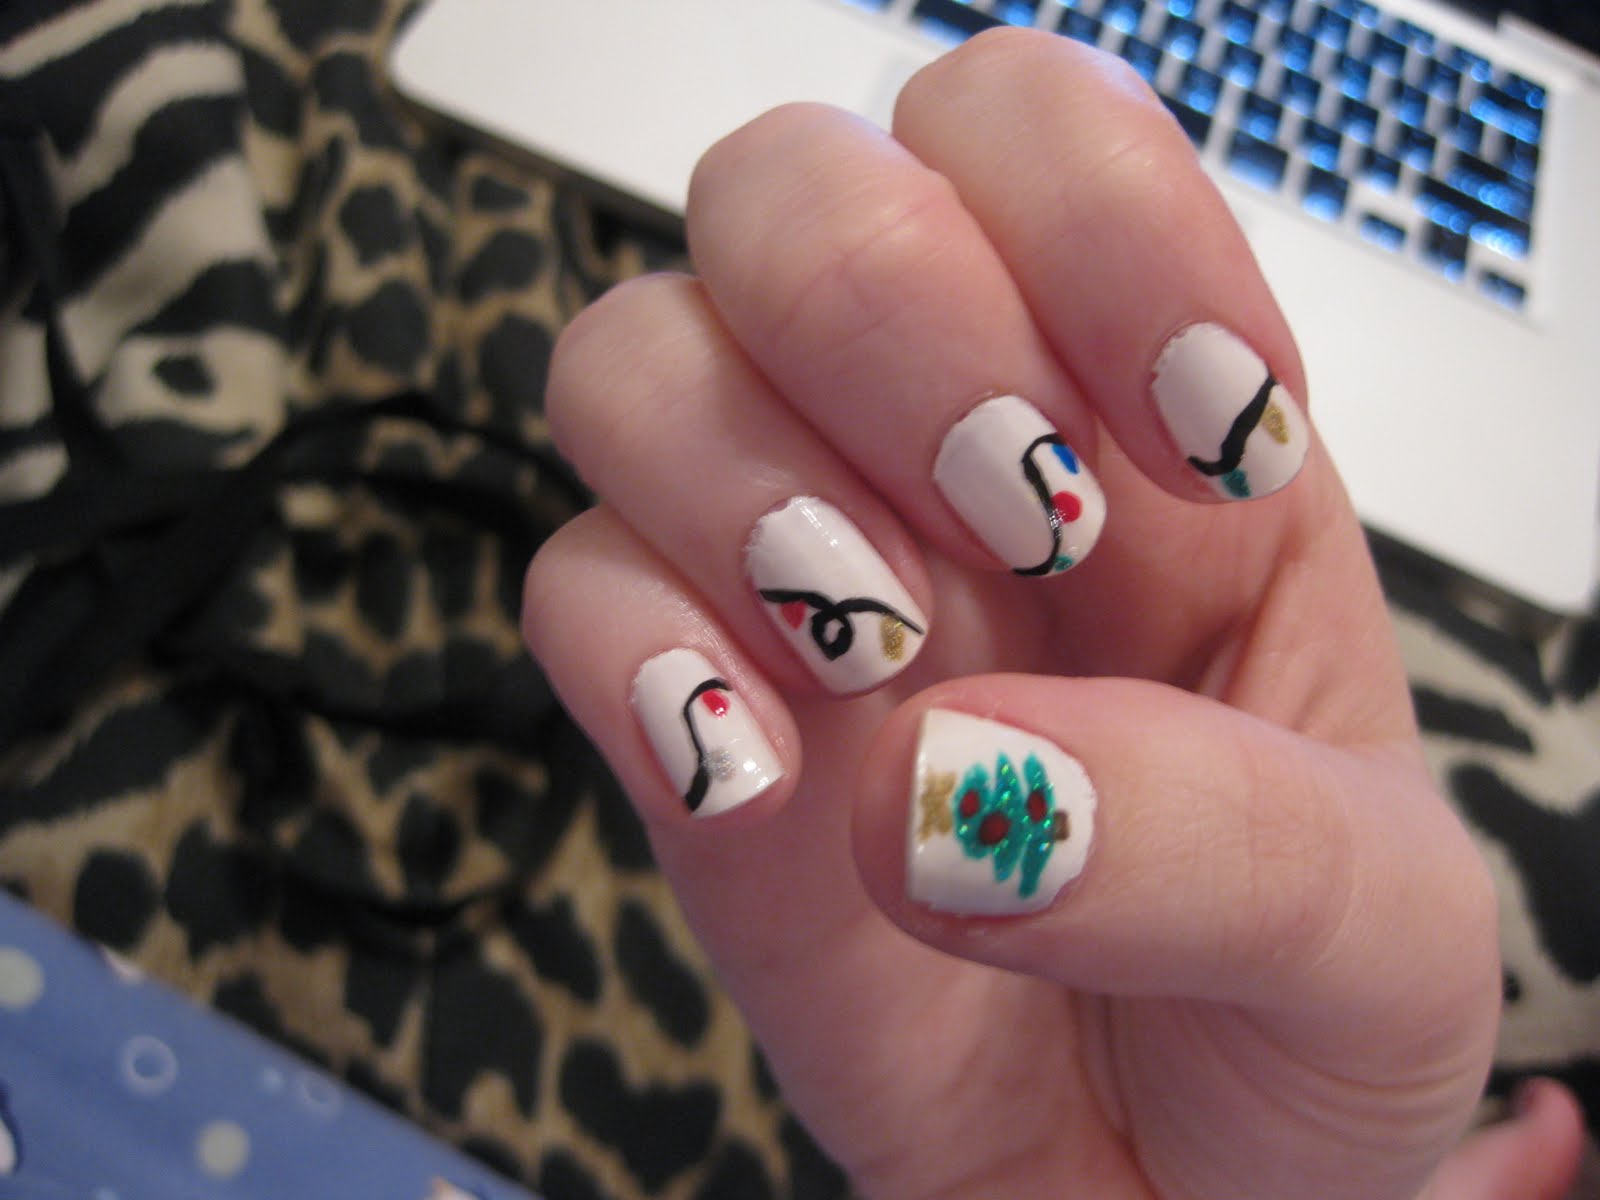
Next, I took the black striping polish and made some wavy lines across my nails. Try to make it look like the line goes across all the nails. Add some lightbulb-looking shapes on each of the nails. I did two to three lightbulbs in different colors.
After I took care of the string of lights, I went to work on the thumbnails. I used the green polish and a fine-tipped brush to make a Christmas tree shape. Then, I took the gold polish to make a star, red polish for ornaments, and brown polish for a trunk. Here's the end result:
And here is the completed look! I've been getting a lot of compliments on it. If you give it a try, let me know how it goes.


It's the most wonderful time of the year

I love the holiday season, for reals. I could go on and on about why I love it, but I'm sure you all would rather not read my nostalgic musings about hot cocoa, snow, and Christmas movies.

One thing I adore about the winter, though, is the excuse to wear glitter nail polish. I'm not sure why, but for some reason I feel like I can only get away with straight-up glitter in the winter. Maybe it's the frigid sunbeams glinting off the snow? I don't know, and I don't care. I love me some glitter.

Here is a nail design I did that involves my love of glitter and all things holiday. The first step is to apply a base coat. I used Sally Hansen's Insta-Grip Fast Dry Base Coat. Once that dried, I painted on Funky Fingers polish in Wonderland. I could have gotten away with three coats for full opacity, but I put on a fourth coat, just for good measure.

I applied Poshe's quick-dry top coat, and once that was dry (about 5 to 10 minutes), I started my design. I kept the design to just the ring fingers and thumbs, because I feel that it's more unexpected. I like having the design on my ring fingers because, as a somewhat-newly engaged gal I'm always flashing the bling. I thought I'd change things up and put the design on my thumbs, too, because I can stare at it while I text/Tweet/Facebook/whatever. Feel free to put the design on all (or some) of your nails -- it's up to you!

To start, take a dark green polish (I used a couple of coats of Funky Fingers polish in Blitzen, because it was the only green I had) and a fine-tipped paintbrush. Use the brush to paint two holly leaves on your nail, making sure that the base of the leaves meet.

One you've done that, take another fine-tipped paintbrush or a dotting tool, and apply one dot of red nail polish to the join of the holly leaves. I used ORLY's Monroe's Red.

Apply a top coat, and you're done!


...Unless you're like me, and studying for finals, and want an excuse for a longer study break. If that's the case, you can do what I did. Use Milani's holographic polish in 3D and another fine-tipped brush to paint a bell on your thumbnails. Outline the bell with a black striper to ensure that the gold stands out against the silver.

NOW, you're finished!

Monday, December 13, 2010

Are your lashes millionized?

So I ventured out to my local Target to see if I could get my hand on L'Oreal Voluminous Million Lashes. I've seen it for as much as $9, but my Target had it for $7.49. There was a surprise when I got to the register, though! I didn't look at the back of the package, since the shade (blackest black) was on the front. Happily, there was a coupon on the back for a couple of bucks off. I have to look at the receipt, but I'm pretty sure it was for $2, meaning I walked outta there paying only $5.49 -- nearly half of what Walgreens was charging.

On to the review. I'm sure you've all seen the gold-tone tube by now. But in case you haven't, here's a picture of it:

It's a little bulky for my liking, but I can let that slide, since it's so easily found in my stash! The wand is one of those newfangled rubberized wands that people seem to love or hate. I love them for separation, but not so much for volume. As advertised, there is a little device-thingy in the tube that scrapes most of the mascara off the wand. I love this -- it saves me the trouble (and mascara!) of wiping excess product off on a paper towel. The one design flaw is that, as you can see below, the wiper do-dad leaves a huge glob of product on the end of the wand. I invariably get this all over my eye area, so I find that I have to wipe this goop off. :/


As for the product itself, it's pretty decent. I've been switching off among Maybelline's Lash Stiletto, Maybelline's Colossal Volum'Express (I hate that name, by the way), and L'Oreal Clean Definition Telescopic. Voluminous Million Lashes (or VML) seems to be closer to the Telescopic than the other two. My lashes are naturally long (thanks, Dad!), but very blonde at the tips. See?

I found out that this mascara is pretty good. I get good length, and the color itself is very black. However, it's really not buildable. If you don't get the desired result in one coat (MAYBE two, if you're lucky), then you're screwed. Here's a picture of what three coats look like. Brace yourselves! (By the way, I didn't let it dry between coats)
AAAHHHH! Spider lashes!!!

I think I'll use this mascara mostly for daytime looks. I'm still on the hunt for a good drugstore mascara that will give me va-va-voom volume for amped up lashes. Here's a picture of what one coat looks like:
MUCH better. As you can see, there's a lot of length, but not as much volume as I would like. I don't have any eyeliner on in this picture, so that may help give the illusion of fuller lashes. Overall, I like this, but it's not my favorite. If you're looking for length, but don't need much volume, this may be for you. If you don't like rubberized wands, stay away. This bad boy is pretty spiky. If you're going to try it, I HIGHLY recommend waiting for a BOGO or coupon. Don't pay full price for this. If you give it a go, let me know what you think! Remember that everyone's lashes are different -- this may become your "holy grail" mascara, and it may make your lashes look like they belong on Tammy Faye Bakker.

And with that image in your mind, I leave you...for today.

Expect a nail tutorial that involves holly and glitter (LOTS of glitter) in the next few days. I'm wearing the design now, and have the pictures and everything all ready to go, but I really have to hit the books. Five final exams don't leave much time for fun. :/

As always, leave a comment or hit me up on Twitter @HonestReviewer if you have questions or just want to say hi.
xo


Philosophy Candy Cane Set

I know I should be studying for final exams right now, but I just feel so Christmasy! I'm burning Christmas-scented candles, drinking hot chocolate, and freaking about because there was actually snow on the ground this morning when I woke up! I'm also watching 25 Days of Christmas on ABC Family. Who could resist a movie where Leslie Neilsen plays Santa with amnesia? :)

Anyway, last night a friend and I did our Christmas gift exchange. She got me this awesome limited edition gift set from Philosophy. (If you're interested in buying it for you or someone else, it retails from Sephora for $22)


Inside the too-adorable-for-words package, there is a Lip Shine (0.5 oz), Foaming Bubble Bath and Shower Gel (4 oz), and Body Lotion (2 oz). I haven't had the chance to try out the shower gel yet, but I see a bubble bath in my near future!


The scent of this stuff is incredible. It's crisp and pepperminty and oh-so-wintry, but there's a sweetness there that really makes this candy cane, instead of straight-up peppermint. I really, really like it.

The lotion is nice. It's not anything too special -- it's just, ya know, a body lotion. It's moisturizing and absorbs quickly. It smells so freaking good, though! SUCH a perfect winter scent.


The gloss is definitely my favorite part of this set. It's thick and slippery without being goopy, sticky, or messy. It's shiny without being "BAM! I'm lip gloss!" It has an average gloss wear time of two to four hours, depending on how much talking, eating, or drinking I'm doing. Speaking of eating, I really don't make a point of licking off my lip gloss (or licking my lips in general -- saliva actually dries out your lips), but this tastes so great. It tastes just like it smells...like candy canes! I like the slant tip applicator, but I find the hole to be a bit too large. I often get too much gloss on my lips, which isn't a great look. But I'm willing to deal with that if it means having this stuff on my lips. Seriously. I plan on buying a backup of this.


In case I didn't make it clear, it's a clear gloss. This is what it looks like on its own.


If you have any questions, feel free to leave a comment or hit me up on Twitter @HonestReviewer.

Friday, December 3, 2010

First video EVAAARRR

I uploaded my first ever video to YouTube. It's a winter nail design, and I did it for beautiefreak92's OPI contest. I think it's pretty cute, and I hope she does too. :)

Here's the video. Let me know if you like it and want to see more. I'm ALWAYS doing my nails and would like an excuse to do more nail art.

http://www.youtube.com/watch?v=EUTvf16Qj4I


Wednesday, December 1, 2010

Sorry for the lack of posts!

I'm sorry I've been MIA lately -- things have been cray-cray between school and running a half-marathon. Oh, and my birthday/Thanksgiving! :) This year, my birthday was on Black Friday, and the best part was that I was with my huge extended family. My parents and brother got me a signed copy of The Great Typo Hunt!!! I'm such a word nerd, and I've been following the story of these guys for a while. I'm so thrilled to have a copy of this book, and even more thrilled that it's signed!!! :D My fiance got some friends to chip in and get me a certificate to go skydiving! I've wanted to go skydiving for as long as I can remember, so I'm absolutely thrilled. THRILLED, I tell you!
I have some fun reviews coming up for you all -- some E.L.F., Bath & Body Works, and maybe even a recipe or two. I do so love the holidays, and I'm always in a baking mood during December.

What else would you like to see from me? I'd love to hear from you. The best way to get in touch with me is to leave a comment here or send me a message on Twitter @HonestReviewer

xo